Arizona Patio Covers can transform your outdoor space into a comfortable, usable area year-round. It can shield you and your furniture from harsh sunlight, prevent fading, and keep rain and snow out.
The material you choose should complement your home’s aesthetic and suit your climate’s conditions. Here are a few popular options:
Patio covers protect outdoor areas from rain, wind, and sun, keeping them comfortable and accessible year-round. They also help preserve furniture, carpets, and other household items from weather damage, extending their lifespan and adding value to your home.
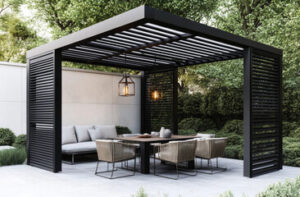
Patio cover designs can vary in their level of protection from the elements. If you’re looking for a shaded and airy space, opt for an open lattice patio cover, which provides a natural feel with filtered sunlight through the partitions of its rafters or roof louvers. A solid roof, on the other hand, offers total coverage from extreme sunlight and direct precipitation. This type of patio cover can be combined with a ceiling fan for maximum air circulation and ambient light control.
Another benefit of patio covers is their ability to help regulate indoor temperatures and reduce energy costs. By blocking and filtering direct sunlight, they prevent excessive heat absorption that forces cooling systems to work harder. This helps lower electricity bills, and it can also prolong the life of your outdoor furniture and fixtures.
Patio covers are a worthwhile investment for Orange County homeowners that offer numerous benefits to their homes and lifestyles. Whether you’re looking to create a versatile living space, boost your property value, or improve your family’s overall comfort and well-being, installing a patio cover is a worthwhile project for anyone.
Natural Extension of Your Home
Patio covers transform outdoor spaces into comfortable, usable areas for dining, relaxing and entertaining. They shield furniture, plants, and other valuable possessions from sun and rain, extending their lifespan and adding to the overall value of your home.
Durability is also important when choosing a patio cover, as it should be able to withstand the elements for years to come. The material you choose will affect this, with wood offering a rustic charm but needing regular polishing and repainting while aluminum and vinyl are long-lasting and require little maintenance. Shape also plays a role, with a curved or angular design echoing the architectural features of your home and helping to create a cohesive look. Additionally, certain shapes can ensure efficient water runoff, preventing moisture buildup that might damage the cover over time.
Lastly, a patio cover can enhance your home’s energy efficiency. By shading a large area of your home, it can reduce the amount of direct sunlight that enters indoor spaces, keeping rooms cooler and reducing the strain on air conditioning systems. This benefit is especially noticeable during the summer, when heat and humidity can drive up your cooling costs.
Patio covers offer a wide variety of benefits, and the best one for your home will depend on your style preferences, budget and functional needs. If you’re ready to enjoy more time outdoors and add a stylish feature that improves your home’s value, contact Maclin Security Doors. We’ll work with you to select the right design for your space and install it quickly and professionally.
Aesthetics
A well-designed patio cover elevates the ambiance of your outdoor living space. It blurs the line between indoor and outdoor, creating an inviting space where you can relax with a book or entertain friends and family. Patio covers also contribute to your home’s energy efficiency and comfort, decreasing reliance on artificial cooling systems.
The type of material you choose for your patio cover is a major factor in determining both the practical and aesthetic benefits of your investment. A solid roof cover offers complete protection from harsh sunlight and rain, while lattice and pergola-style options allow for partial sun exposure and natural ventilation.
Wood patio covers are a classic choice that offer timeless elegance. They can be treated for weather resistance, and the wood’s natural oils repel insects. Depending on your preferences, you can opt for clear cedar, which is free of knots and blemishes for a sleek look, or knotty cedar for an appealing rustic character.
For homeowners seeking a durable and affordable option, aluminum patio covers provide an excellent value. Its strength is derived from extruded aluminum, which has a higher density than roll-formed aluminum, allowing it to span longer lengths without support beams. Additionally, aluminum is resistant to dents and will not warp or rot.
Other patio covering materials offer unique features and benefits, such as insulated panels that regulate temperature and increase energy efficiency, or shade sails, which are designed for a custom look and can be moved from one spot to another on your patio. Other materials like bamboo and recycled plastic can enhance your landscape with a natural appearance, while crystal-clear perspex maintains its transparency without yellowing over time.
Flexibility
Patio covers offer a wide range of flexibility that allows homeowners to tailor their outdoor space to suit their specific needs and aesthetic preferences. For instance, louvered patio covers allow users to easily adjust their shade throughout the day and under varying weather conditions. The slats of these patio cover options are typically controlled remotely or manually, allowing for the perfect amount of sunlight to filter in while still protecting the patio from harsh UV rays. Furthermore, louvered patio covers reduce cooling costs by shading the home’s interior from direct sunlight and reducing heat absorption, making them an energy-efficient investment for any homeowner.
Other popular patio cover styles include pergolas, lattice covers, and retractable awnings. These options also offer a wide range of design and material choices, catering to various aesthetic preferences. For example, pergolas feature a lattice-like structure that is adorned with climbing plants for a bright and airy look. Lattice covers are an excellent choice for homeowners who prefer a more subtle shade solution that still provides plenty of sun protection, while pergolas boast open beam configurations that lend a classic and elegant look to any patio.
Retractable awnings are another versatile patio cover option that can be extended for shade or retracted to let in the sun, depending on the weather. They can be operated with the push of a button and come in a variety of colors, allowing homeowners to personalize their outdoor spaces. Additionally, these awnings can be integrated with heating elements for year-round comfort, ensuring that outdoor living areas are always welcoming.
Durability
When evaluating a patio cover, it’s important to consider durability. Different materials offer varying levels of strength, weather resistance, and general upkeep. Consider your budget, aesthetic preferences, and climate to determine the best fit for your property.
Wood is a popular choice for its natural beauty and classic appeal. It’s available in various finishes and can be stained to match your style. However, wood requires routine maintenance, including sealant and painting to prevent rot or mold growth. It’s also susceptible to moisture, which can lead to warping or rot if not treated properly.
Aluminum is another option for patio covers, offering a durable structure that’s easy to maintain. It’s resistant to rust and corrosion and can be enhanced with features like baked enamel coatings for energy efficiency. Additionally, it’s lightweight, making it easier to install and transport.
Polycarbonate is another highly durable material that’s also UV-resistant. It can withstand rain, hail, and strong winds without warping or cracking. Polycarbonate is also a great choice for those who are looking for a bright and airy patio space, as it allows natural light to pass through while blocking harmful UV rays.
When it comes to a sturdy and stylish shade solution for your outdoor living space, nothing beats the look of a custom patio cover. These structures provide protection from the elements while adding to your home’s curb appeal and increasing its resale value. By enhancing your home’s outdoor space, you can enjoy more time outdoors with friends and family. And with the right patio cover, you’ll be able to enjoy your outdoor living space year-round!